

Make Your Own Storage and Gift Boxes
Posted on Tuesday, 12 March 2013 and filed under Lifestyle , Maurice Thurman , . You can follow any responses to this entry through theRSS 2.0 . You can leave a response or trackback to this entry from your site
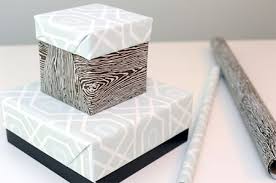
The appearance of the original box is not important as all advertising and markings will be covered from view. The photographs show that boxes can be covered with decorative paper (a finished box) or cloth(still under construction). You could also be more creative and cover a box with newspaper or magazine cuttings, cut-up photographs etc. - choose a theme for the box according to your wishes.
Any glue is suitable for the covering material, but it must be spread over the entire side of a box. Spread it evenly else the covering will be look uneven and less professional. Contact adhesive is the quickest method to achieve a useable box but contact adhesive is very unforgiving of mistakes and can easily cause creases in paper and folds in cloth.
Boxes with lids are often the most desirable, but most packaging boxes tend not to have them. Never mind, because a lid can be made from any suitably sized piece of flat cardboard of similar thickness to the box being covered. This piece can be cut from the side of a larger box if you have no other source. Place the open end of the covered box over the flat cardboard and trace around the outside of the box. Allow a little extra space so that the lid will fit easily - this is especially important if you are covering it with thick material. Decide how deep you want the lid to be and draw a parallel line around the rectangle you have traced at the chosen depth of the lid (See the diagram). Complete drawing the squares at the corners and then cut these 4 squares out. You can now crease along the edges of the first rectangle you drew and fold over the edges to make the lid. Fix the corners in place temporarily using pieces of cellotape, then, when you are happy that the corners are correct and the lid fits the box, tape completely around the outside of the lid with cellotape and this will add strength to the shape.
Now you can cover the lid using the same method as you used for the box. You can of course use different material if you wish.
So be creative, give yourself something to smile about and make your friends happy. Recycle those boxes. Create your world.
Author: Maurice Thurman
Copyright © 2013 Sandhya Maarga Holistic Living Resources
Holistic Living Annex (MARCH 2013)
0 Responses for “ Make Your Own Storage and Gift Boxes”
Leave a Reply


Inspirational Gallery
